Showing posts with label tutorial. Show all posts

Sunday, February 12, 2012

Make Your Own Butter - Tutorial


Butter - Who knew how simple it was to make your own! I found a ton of tutorials and they are all great. My favorite one is from 2 little hooligans. Her pictures are beautiful and the directions sweet and simple.

But did I tell you that I MADE BUTTER TODAY? I don't know why I'm so excited about it. It's such a simple concept....but I was tickled pink and we all ate the first batch right away.


OK, here's what you need:


Heavy Cream
Salt (optional)
Jar (with tight lid)
Yeah, that's it....seriously.


Instructions:

Pour cream into jar 1/3 to 1/2 full.
Shake the jar for 20 to 30 minutes.
You'll see 4 stages:
Cream
Whipped Cream
Whipped Butter
Butter & Buttermilk

Once your butter separates from you buttermilk,
drain the buttermilk out into a dish and
keep shaking it for a while longer to get all the buttermilk out.
Drain out your remaining buttermilk and save it for...buttermilk pancakes, maybe?
Add your salt to taste (I added 2 pinches of sea-salt for my small batch)


Taa Daa!!!
Butter

***WARNING***
You may have delusions of grandeur when you're finished...like you just invented fire or something. Not to worry. After proclaiming "I just made butter!" to your husband for the third time and he just stares at you like your crazy, the delusions will pass....but seriously, I MADE BUTTER TODAY!

xo
Krista


Linking up:

Funky Junk's Saturday Nite Special
apinchofjoy.com
Home Stories A2Z

Friday, February 3, 2012

DIY Daily Affirmation - Tutorial


We are currently remodeling/sprucing up our girls room and I wanted to make them an inspirational sign...sorta like a DAILY AFFIRMATION for them. Seriously, it is so hard being a little girl these days and I want my girls to grow up knowing that being "PERFECT" isn't what really matters. So, you can make your sign with what ever is meaningful to you.

Supplies


Canvas (flat, 3D, a scrap piece of wood,...what ever)
Paint
Paint brush
Vinyl Letters (or stickers)
Transfer Paper
Tape (painters or masking)
Paper Towel

Steps

Get Inspired and then cut out your inspiring words.
I used the Silhouette Cameo for my vinyl letters.
I found my original inspiration on Pintrest HERE.


Apply your transfer paper to your vinyl letters.


Make sure you use the grid on the transfer paper to help line up your words.


Add a 2" border around your canvas with the tape and apply your vinyl letters....and realize that white may not have been the best color choice for the vinyl.
My canvas was 16" x 20" but my vinyl sheet was only 12" wide. To avoid having to line up each line myself, I chose to add a 2" border.


Suddenly decide you're not in LOVE with the sign and call your girlfriend for advice....she affirms what you already know,... that the words don't sound right and the color's got to go....use a different color vinyl this time.


Choose a new paint color, wonder how old the paint is and hope there's enough left to paint the sign.


Paint, wait as long as you can for it to dry, peal off the vinyl and the tape and admire your work!

All done....I can't wait to see it in the girls room when it's finished.

xo
Krista 

liking up to:
g*rated Momma Hens Coop

Saturday, January 7, 2012

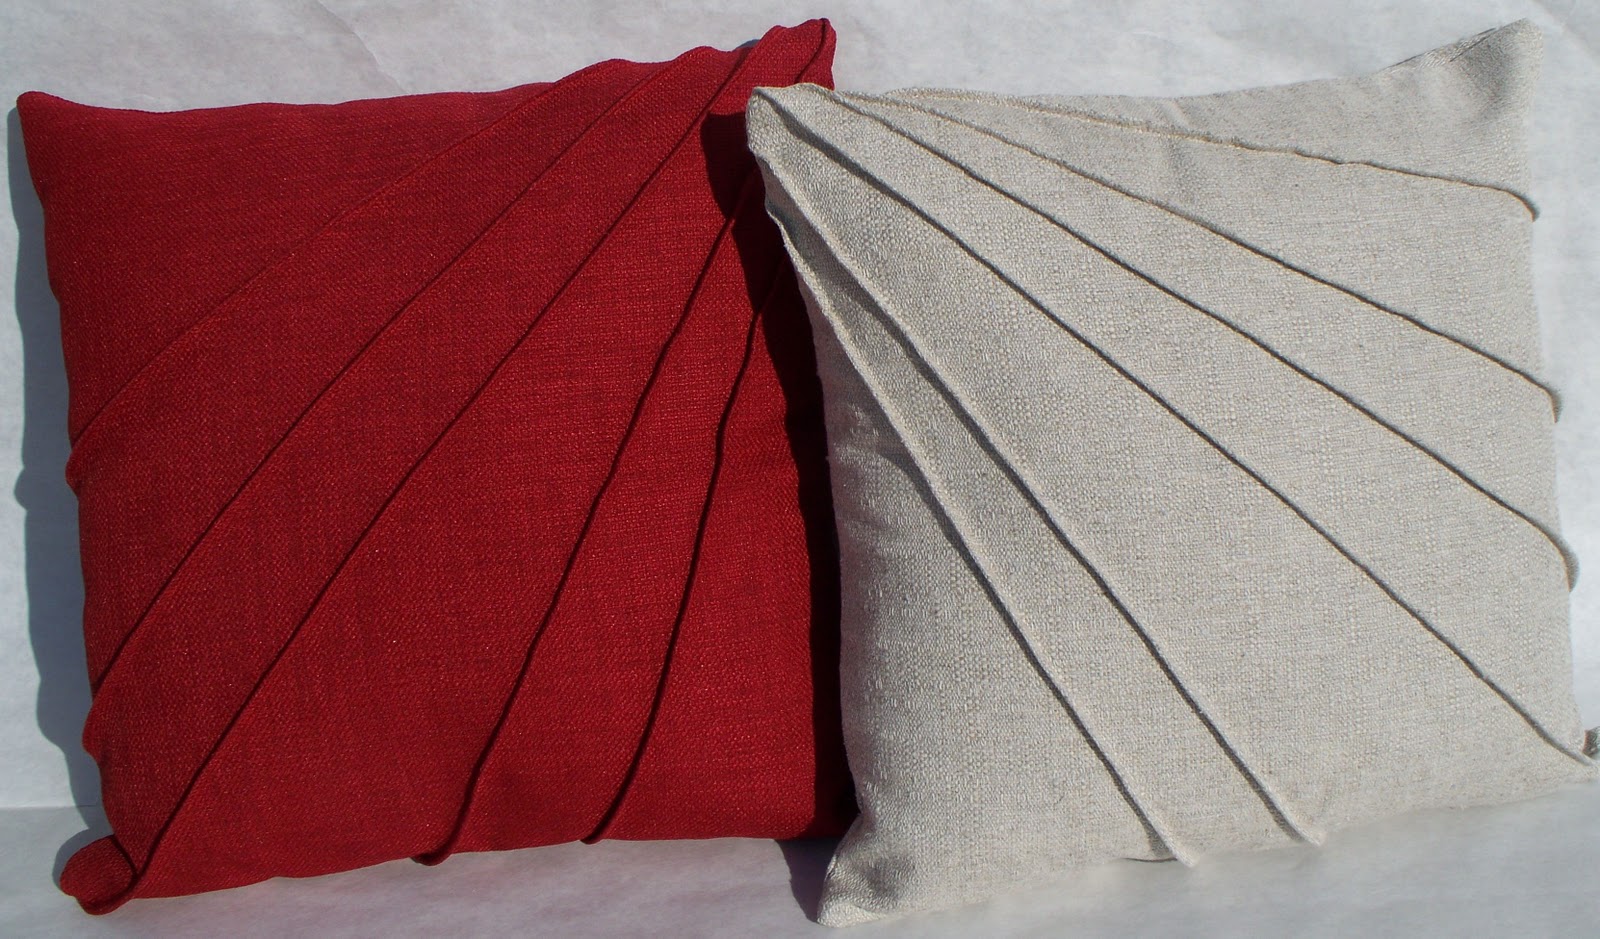
Star-Burst Pintuck Pillow Cover - Tutorial


I think the most intimidating thing about pintucks is that they are all usually uniform. Whether on a pillow or shirt or wherever, you see them in nice, neat, even little rows....but they don't have to be neat or even or intimidating. Here's a fun little project for you to get started with pintucks.

We're going to be creating a fun pillow cover that looks clean and neat and we are not going to measure our pintucks at all...HOW CRAZY IS THAT?...it's not crazy..it's fun and creative and full of whimsy. Keep in mind that I'm using a zippered back for my cover which you can find the tutorial for here.


Star-Burst Pintuck Pillow Cover Tutorial

Supplies 
Fabric for front
Fabric for back
Ruler
Rotary Cutter & Mat or Scissors
Sewing Machine
Coordinating Thread


Cut fabric for the front of your pillow cover to size ( size of pillow + seam allowance + 3")
My pillow is 14". So, I cut my fabric 17.5" square. (14" + .5" + 3")
If you're going to make a hundred pintucks and make them run every which way..you may want to add more than 3" to your measurements..at least the first time.
Cut the fabric for the back of your pillow cover to size (size of pillow + seam allowance)
My pillow back is 15" square AFTER I added a zipper....tutorial on zippered back here.


Fold fabric over, wrong sides together, corner to corner as shown in picture above.


Set your needle placement to the far right. Starting at the long corner, sew along fold..about 1/8" from edge. Just go with what looks nice to you. If you like a tiny pintuck, then go smaller than 1/8".
If you are using thick tread and want a nice top stitch to show, be sure to increase your stitch length just a bit.


Start back at the corner where you started your first stitch and continue sewing pintucks until you are satisfied.


Iron fabric folding all pintucks over to one side. 

Square off  your starting corner as shown above with a rotary cutter or scissors.


Square off the rest of your fabric.
My finished fabric is 15" square.
Pin cover backing to cover front.
Finish edges and trim corners.
Be sure to leave the zipper OPEN before you sew your cover shut as indicated in the picture above. The zipper allows you to turn your cover right side out after you sew all four sides shut.


Your Done!


Linking up to:

Sunday's Best Linky Party!


Friday, January 6, 2012

Pillow Cover with Hidden Zipper - Tutorial


I'm kinda picky when it comes to pillow covers and their openings. Envelope style openings are not my favorite. They're great for when you don't have a zipper or when you want to keep your cost down, but I don't' like how they can bulge out...they don't keep the pillow's shape very well. Buttons are OK and can add a pretty detail to the pillow, but they just don't work in my house with all the hoodlums laying around. I prefer a stuffed pillow where I can throw the whole thing in the wash or a zippered cover. I used to sew my zippers on the side seam. Recently, I came up with a new way to add my zippers. I think it looks much nicer AND I've created a tutorial just for you!

Zippered 14" Pillow Cover Tutorial

Supplies 
Fabric 15" x 33.5"
Ruler
Rotary Cutter & Mat or Scissors
Sewing Machine
Zipper Foot
Coordinating Thread
12" zipper (or longer)

Cut fabric for front 15" x 15"
Cut fabric for back 6.5" x 15" and 12" x 15"


Center zipper on long edge of 6.5" fabric line up right side of zipper to right side of fabric and sew in place using a zipper foot.


Fold fabric back, wrong sides together, leaving a "flap" over right side of zipper and leaving about a 1/4" edge past the other side of the zipper, as shown with the purple arrow in the picture above. Pin in place and sew along previous stitch line. Don't stress about the size of the flap..as long as it covers the zipper and you think it looks good, then it's fine.


Fold "flap" over and pin in place exposing zipper.


Sew other side of zipper to the 12" x 15" piece of fabric, right sides together.  To give you a perspective..the pin indicated by the left arrow is holding the "flap" down. Be sure to line up your fabric edge with your zipper edge (as indicated by the other arrow) and be sure that the edges your 6.5" piece of fabric lines up with the edges your 12" piece of fabric. When you are finished, you should have a rectangle with a zipper in the middle.


Trim excess fabric off the end of the 12" piece so that your pillow cover backing is 15" square....you may ask..."why do I need to trim my fabric? why didn't we cut it right the first time"?..I like to err on the side of caution... it allows me some wiggle room when fiddling with the zipper flap.


Pin cover backing to cover front. Sew using a 1/2" sew allowance. Finish edges and trim corners.  Be sure to leave the zipper OPEN before you sew your cover shut as indicated in the picture above. The zipper allows you to turn your cover right side out after you sew all four sides shut.


Your Done!


Wednesday, December 21, 2011

Ruffle Pillow On The Fly!

Our wonderful puppy, Niah, partied a little too hard last night and ripped a hole in one of our pillows. But, not just any pillow. It was my youngest daughter's FAVORITE couch pillow. You can imagine the devistation when she awoke to find it sitting on my sewing table with it's stuffing spilling out.


Never fear! Mommy's here!....even though she had other things to do this morning. Lucky for her I had the SAME fabric I made the first cover out of almost 5 years ago. This time I'll make it better with ruffles! Here's what I did.

First I cut out peices of fabric measuring 17.5" square. Then I cut 4 strips of fabric 2.5" the width of the fabric....All under the strict supervision of my 2 yr old.

Supervisor approved of the fabric choice.

And she approved of the cuts made.

I don't have pics of the next few steps...here they are:

  • Sew strips short ends together.
  • Fold long strip in half wrong sides together
  • Create one long ruffle using preferred method. I have ruffle tutorials here and here.
  • Finish one end with a rolled hem.
  • Sew ruffle onto one square right side
  • Cut excess ruffle off and finish end with rolled hem...being sure to overlap ends. as shown in picture below.
  • Pin the other square on top, sandwiching the ruffle inside.
  • Sew both squares right sides together leaving an opening big enough to turn right side out and big enough to stuff pillow form inside.
  • Remember that the dog ripped the pillow form and quickly repair the hole.
  • Close opening with a hand stitch.
Overlapped ends.
Just ease the ruffle around the corner

Pin opening closed before handstitching.

Used the leftover ruffle to make a ruffle flower.
 Be sure to get the approval of your Supervisor's Supervisor (You can see her knee in the above picture) before you finish.

And here it is. She happier with her new one than she was with the old one.

Unbeknownst to her, Niah was sniffing out it's chewability already!!

Linking up to:


http://www.thethriftyhome.com

LinkWithin

Related Posts Plugin for WordPress, Blogger...